
Installation and configuring plug-in Feed Manager 1. Complete description 1. Complete description 1. Feed file type. The name of feed network. For example: AmazonAds, Google, etc. If the desired feed network is not in the list, we can add it for free. For example: 5. After generating feed file, it will be archived. Second tab – Feed Settings First line is a link from feed website to specification description. Changing feed scheme You can change scheme for feed network. If you change feed scheme, then it will affect all files feed for this feed network. Third tab – Product Filters At Product Filter tab you can specify which products (categories) will be exported into feed file, as well as modify their parameters. Parameters can be set for a certain product and for a category. 1. Don’t export new products. If you create a new product, it will automatically have “No” marker (don’t export). 1. Export this category (a separate product). Can take three values: No – do not export With this parameter, you can specify which products to export and which not. An example of a window with data entered: 1. Taxonomy Category where this category (this product) is located. The same form but for the Products: Fourth tab – Conditions. 1. Type: Product or Product Specification. Edit form of product selection conditions: 1. Type: Product or Product Specification. Examples of various conditions: 1. Filter the products with a price greater than 0. Fifth tab – Schedule Settings 1. Enable/disable the schedule. Sixth tab – FTP Settings 1. Enable sending feed file to FTP server. 2. How to create a new feed. In the new window, select feed type (feed format) (1). Name feed (2) and specify export file name (4). Note: the names shall not repeat!!! For example: All feed files are saved in Content\files\ExportImport folder. See Full Description for other parameters. 3. Working with filters. How to select only one product category? Option 2. Note. 4. Feed editing For convenience, the option is added to change feed parameters on category and product setting pages (see Fig.). Open Ebay Selling Manager Pro page in your profile. Carefully read the instruction (1). You may want to change default parameters. Save your MerchantId (see Fig.) Ebay Product Inventory You should select a Ebay category for each categories/each products. Ebay Basic Template You should select a Ebay category Id for each categories/each products. For example. Ebay Category Crafts > Home Arts & Crafts > Candles & Soap > Scents, Fragrances > Fragrance Oils has id 28117 (see Fig.). Open My Bulk Upload page in your profile. Read carefully. Open feed settins page and write your Ebid MerchantId (1) 7. How to export products with qty >0. Open Conditions Tab 8. How to export product specifications. You want to export product specification by name Color Open Feed Settings Tab 9. How to change product title. 10. How to add new custom feed template (CSV, XML, XLSX, JSON). Plugin allows to add custom feed type. It's very easy. You can find the file feeds.xml in root plugin folder. This file has information about all support types (Ebay, Amazon, etc.). You can add your custom feed type inside this file. Each row for feed type has such structure: <FeedNetWork> Description parameters: Example 1. Example 2. You want to create your custom feed template. Plugin supports only csv file as source for custom feed type. <FeedNetWork> Create new picture file MyCustomType.png. 11. How to add a static variable to the link field (affiliate variable for goole, etc.). Select Tab Feed Settings. Find Product url, and press Edit button. Add suffix "?affiliate=google". You can add any string. Be carefully with "/" at the end of the url. See picture. 12. How to use formula for calculation values. Pluin supports special token 'formula', you can use it for calculation of any values. 13. How to add tag ProductData to Amazon Product template (XML). If you need to add ProductData you can do it using XPath. See the example. <FeedAttribute> Plugin will create new subtree <ProductData> 14. How to use external plugins. If you need to manipulate with your data before uploading in the feed file (example. you want to remove the word 'New!' from product's name) you can use external plugin for it. FeedManager sends information about product, about feed attribute and about type of feed in this external plugin. External plugin removes this word 'New!' and returns new string back. Or another way. You can calculate new your price using your own logic. 1. Create plain c# DLL library with the name of class FeedManagerPlugin and public method ReadAttributeValueAsync (nop 4.40 and nevers) or ReadAttributeValue (nop 4.30 and olders) Example using Nop.Core.Domain.Catalog; //nop 4.30 and older Compile it. Name the library replacenew.dll 2. Create new folder Plugins in the folder FoxNetSoft.FeedManager 4. Open the feed template XML file and change the atribute parameter FieldNameCode. <FeedAttribute> 5. You can use productAttributeCombination if you want to create new virtual products using product attribute combinations. FeedManager send the same product value and different productAttributeCombination value. If product doesn't have product attribute combinations this parameter wil be NULL.
2. How to create a new feed from the list of preconfigured templates
3. Working with filters. How to select only one product category?
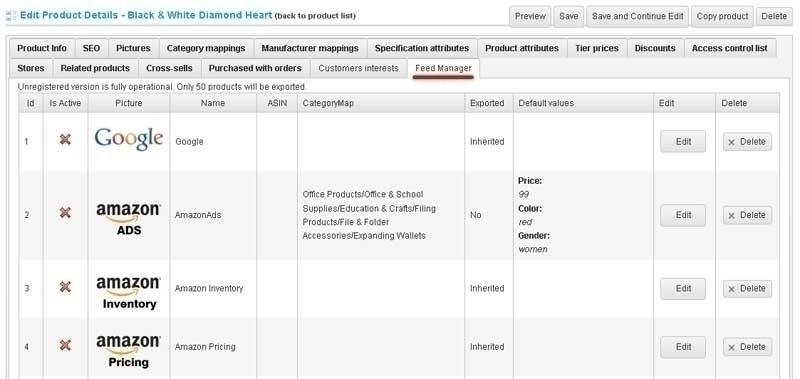
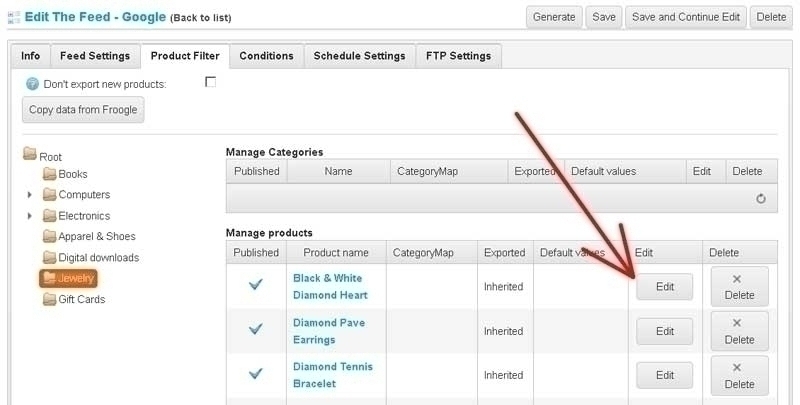
4. Feed editing
5. Setting up for Ebay
6. Setting up for Ebid.net
7. How to export products with qty >0.
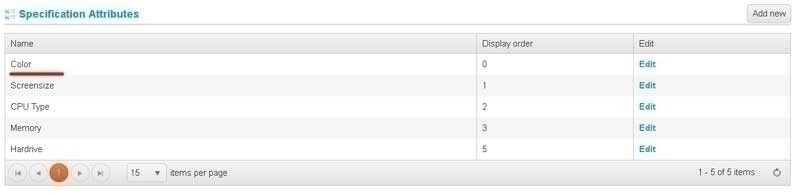
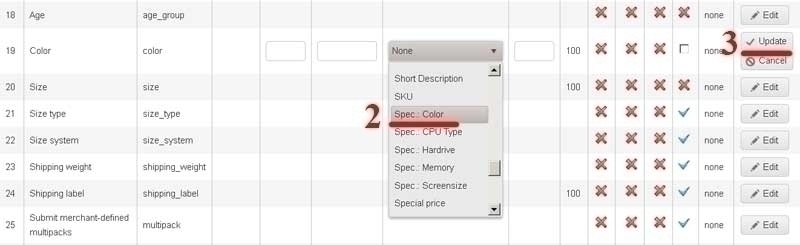
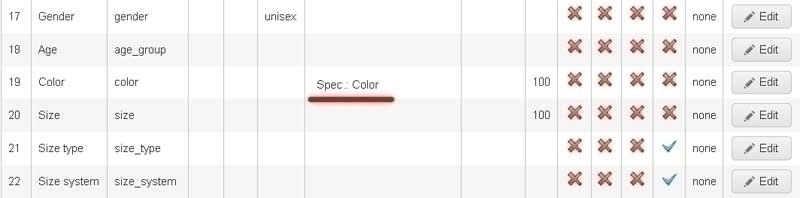
8. How to export product specifications.
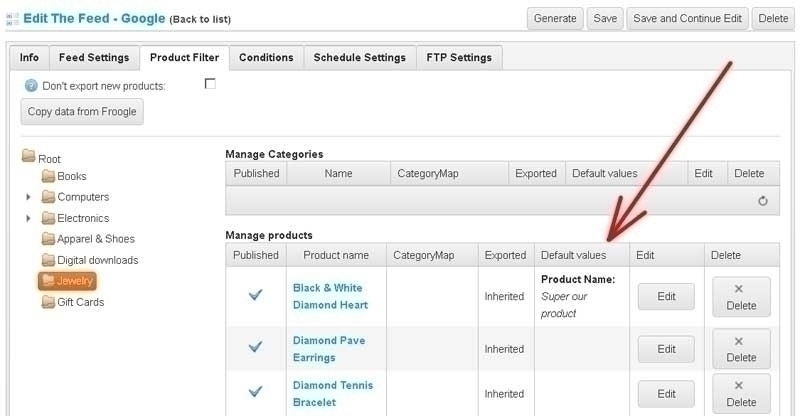
9. How to change product title.
10. How to add new custom feed template (CSV, XML, XLSX, JSON).
11. How to add a static variable to the link field (affiliate variable for goole, etc.)
12. How to use formula for calculation values.
13. How to add tag ProductData to Amazon Product template (XML).
14. How to use external plugins.
Key features
You can create multiple feed files for a single Feed network.
For example:
You can create one feed file for Tablets category and another for Shoes category, the third – for Phones category.
You can create one feed file for USD currency, and another for EUR currency.
If you have a multistore, each store will have its own feed file.
If your store supports multilanguages, you can create your own feed file for each language.
Key terms (Glossarry):
Feed network – a website/trading site/etc. for which the file is created.
Feed file – a file created by a plugin to export products into feed network.
Feed scheme – specification file of feed network that describes export rules.
Feed – a task of a plugin that lets you create feed file for feed network.
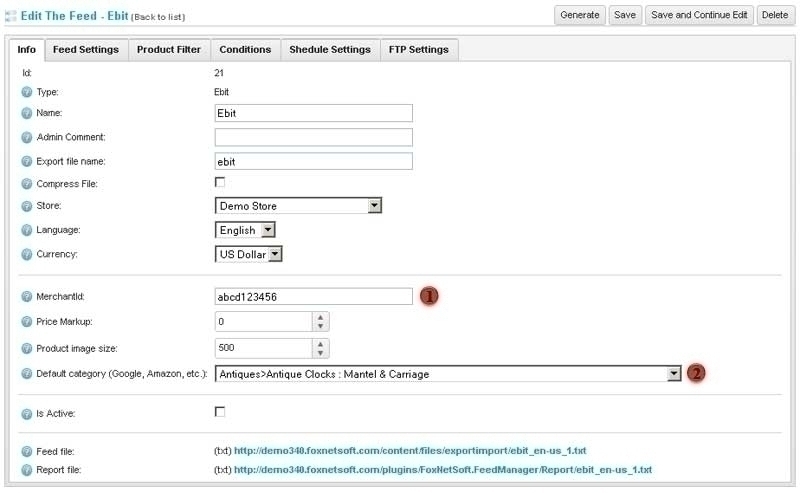
First tab – Info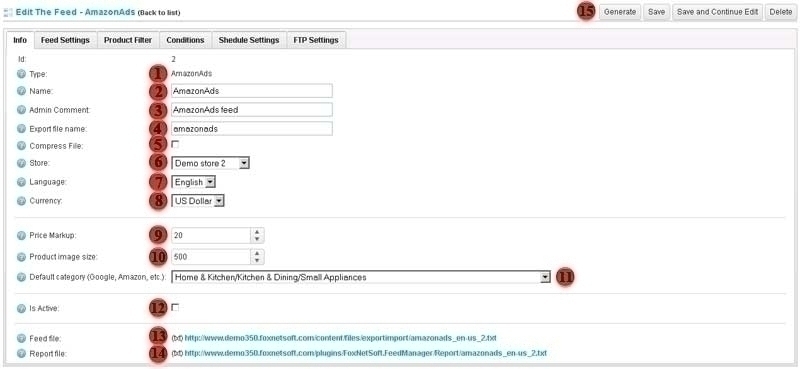
2. Feed name. Used by website administrator to identify feed file. For example: AmazonAds for Tablets category.
3. Administrator’s comment.
4. Export file name. Feed file name is composed as follows:
(Export file name)_(language)_(storeId).(file extension)
amazonads_en-us_2.txt
amazonads feed name (4), language English en-us (7), second store (2), file type txt.
All feed files are saved in Content\files\ExportImport folder.
6. You can specify a store for which feed file will be created.
7. You can specify feed file language.
8. You can specify the currency in which the prices will be recalculated. For example: basic currency of online store is USD, and you need to export prices in EUR.
9. Price markup. Use if you want to increase/decrease all prices. For example: If you want to automatically increase all the prices by 12%, you need to specify “12” in this field. For example: price of the phone in online store is USD 88, its price in feed file is USD 88 + 12% = USD 98.56.
10. Product image size. Note: all images are exported without watermark. This is one of the requirements of feed networks (Google, Amazon, Ebay, etc.). If you want to use watermark in your store, use our plugin NopWatermark. You will not have conflicts with the images.
11. For those feed networks that require specifying Taxonomy Category, you can select Taxonomy Category, which will be set by default for the entire feed file. Note: you can also specify Taxonomy Category for a particular product or category. If feed network requires Taxonomy Category, this parameter will be disabled.
12. Active or inactive feed. If feed is inactive, you can manually generate feed file by clicking Generate (15). If feed is active, feed file will be generated automatically according to the schedule.
13. Direct link to feed file. If you use compression (archiving), you will also see a link to the archive file.
14. Link to report file. It is used to analyze the errors during generation.
15. You can manually generate feed file. Attention: if “Send to FTP Server” option is enabled, it will also be sent there after generation.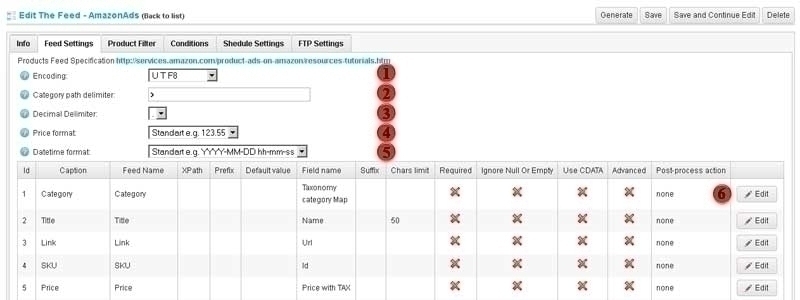
1. Feed file encoding type. Do not change it. It is already preinstalled.
2. Category path delimiter. It is used in some feed networks. Do not change it. It already preinstalled.
3. Decimal delimiter for numerical data (price). For some feed networks (France) “,” (comma) is used. Do not change it. It is already preinstalled.
4. Price format. Do not change it. It is already preinstalled.
5. Date/time format. Do not change it. It is already preinstalled.
6. Scheme for feed file generation. All schemes are saved in FeedSchema folder (plugin folder). Each feed network has its own personal scheme. For example: for Ebay – ebay.xml, for AmazonAds – amazonads.xml, for ShopZilla – shopzilla.xml, and so on. Note: if you change scheme file, it will be changed for all feeds (feed files) for this feed network. Also note that after plugin upgrade, all schemes will be updated.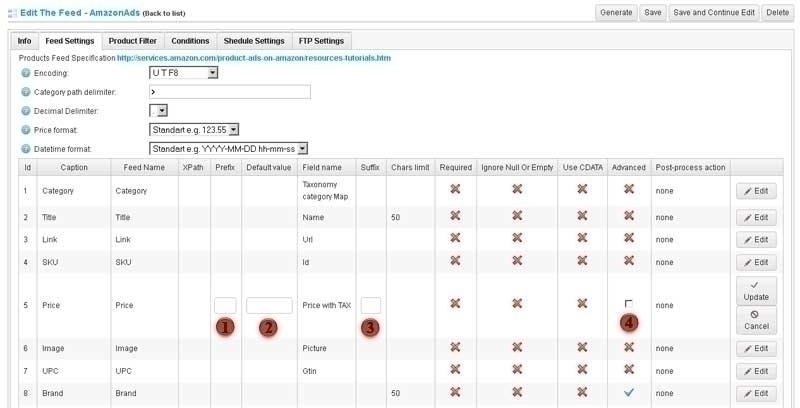
1. Prefix. This text will be added before each value. For example: If you specify “USD” prefix for Price, then all prices after export will be like “USD 15.25”.
2. Default value. If there is no parameter value, this value will be shown.
For example:
You can specify the cost of delivery for all products.
You can specify product manufacturer in case where it is not explicitly assigned to a product.
You can specify “New” status to the product.
3. Suffix. This text will be added after each value. For example: If you specify “USD” suffix for Price, then all prices after export will be like “15.25 USD”.
4. Advanced attribute. If you open the form to change feed data in product or category settings, all parameters will be hidden that have Advanced attribute. This attribute is for a convenience of the store administrator. For example: If you sell clothing, disable Advanced attribute from color, size and other parameters. It will be more convenient to change them immediately.
Note.
When you update the plugin, scheme file will be updated as well. If you have made changes to scheme file, repeat them after upgrading.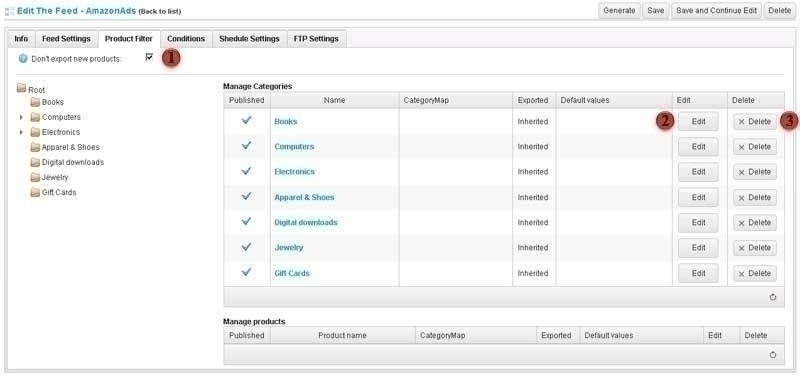
2. Edit feed scheme parameters for a category (a separate product).
3. Delete feed scheme parameters for a category (a separate product).
When you click Edit (2), the following window appears: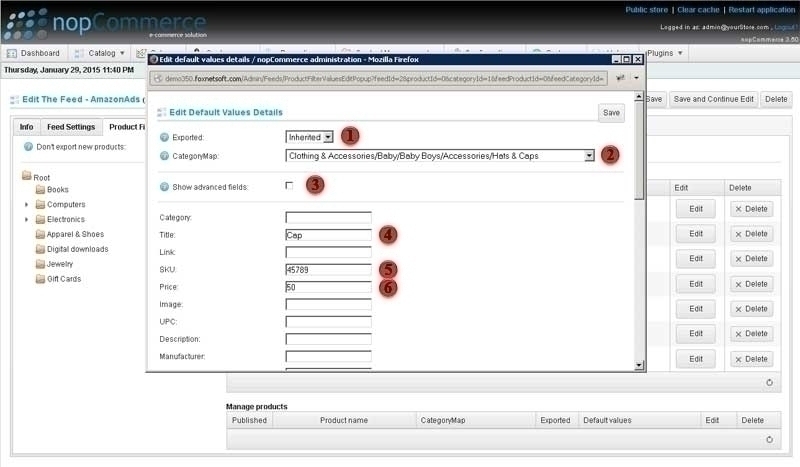
Yes – export
Inherited – inherits the value from the parent element. If “No” is specified for the parent element, the product (all products in the category) will not be exported.
For example: disable export of the products in Books category.
2. For those networks that require specifying Taxonomy Category, you can select Taxonomy Category, which will be set by default for a product or all products of the category. Note: you can set the value of this parameter for all feed at the first tab Info.
3. Show advanced fields. For the convenience of online store owner, by default only the basic parameters of feed scheme are shown. If you check this box, you can see all feed parameters. Note: you can specify main and extended feed parameters at tab Feed Settings.
4, 5, 6 – You can change feed parameter for a particular product (entire category). For example: set a price of USD50, or change SKU of the product to 45789. Note: this is not the default value. This is the very value of the parameter. For example: SKU of the product in online store is 14578, and in export the product will have SKU 45789. Here you can set the color, size, cost of delivery, etc.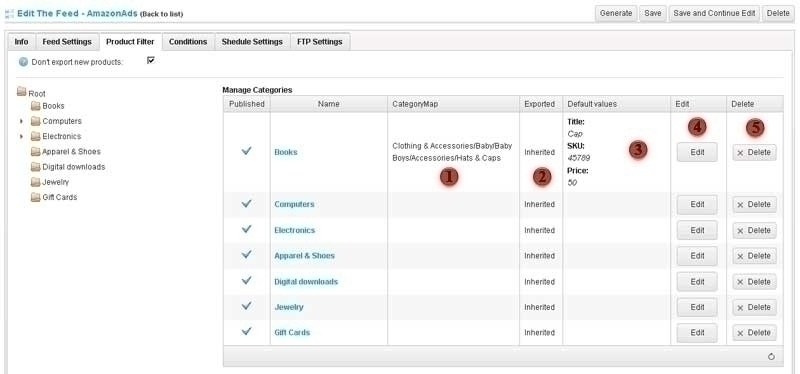
2. Export the category (product) or not.
3. Feed scheme parameter values for a category (a separate product).
4. Edit feed parameter values.
5. Delete all feed parameter values. Export status will change to Inherited.
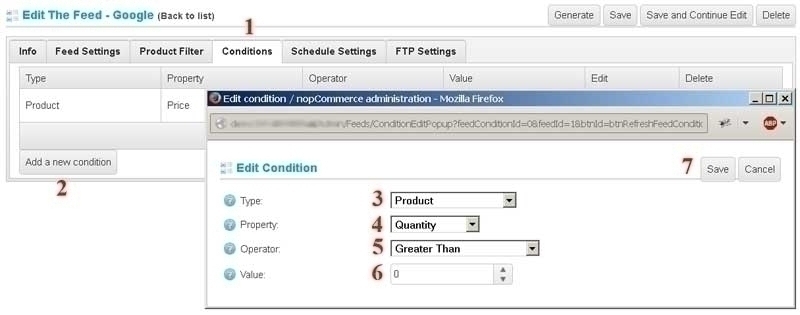
Conditions to select the products for export.
If several conditions are specified, logical “AND” is set between them. All conditions must be true.
2. Property. For example: price, category, manufacturer, etc.
3. Operator (greater than, less than, equal to, etc.)
4. Parameter value.
5. Edit
6. Remove
7. Add a new condition for product selection.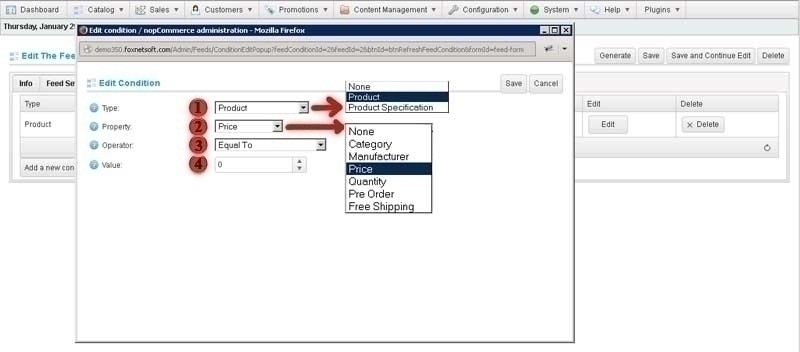
2. Property. For example: price, category, manufacturer, etc.
3. Operator (greater than, less than, equal to, etc.)
4. Parameter value.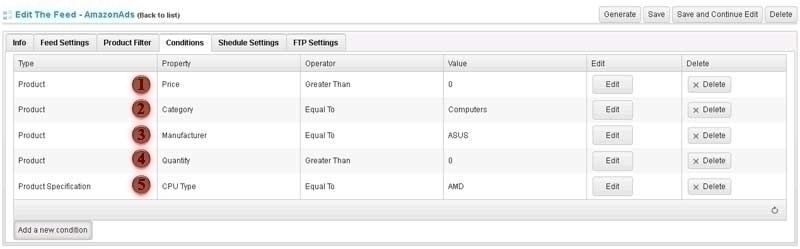
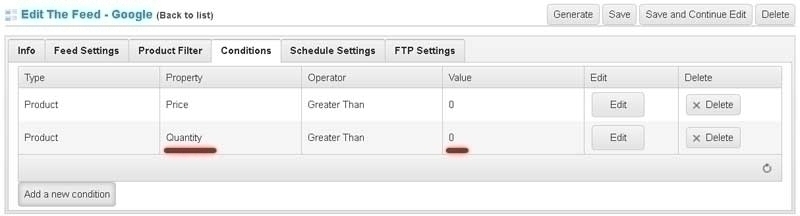
2. Filter only the products from Computers category.
3. Filter only the products of ASUS manufacturer.
4. Filter the products that have a remaining quantity greater than 0.
5. Filter the products that have CPU Type specification and it is equal to AMD.
2. Days of the Week.
3. Time.
If you want feed file to be generated automatically, make feed active (tab Info) and enable the schedule, then select a day of the week and an hour to generate feed file.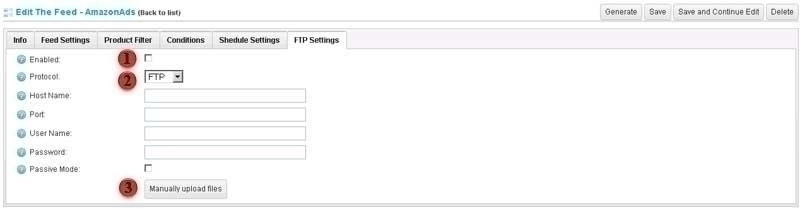
2. Parameters of FTP server.
3. You can manually send feed file to the server.
Note: if there is a checkbox against Compression (feed file archiving), only the archive will be sent to the server.
Open the list of feeds and click “Add new”.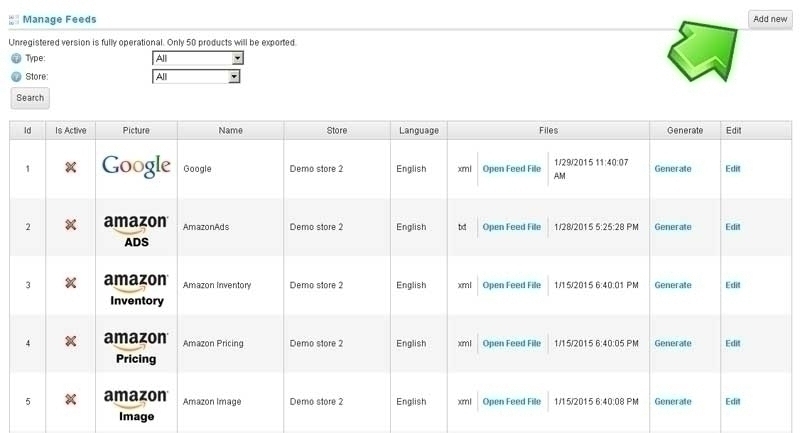
Feed file name is composed as follows:
(Export file name)_(language)_(storeId).(file extension)
amazonads_en-us_2.txt
amazonads feed name (4), language English en-us (7), second store (2), file type txt.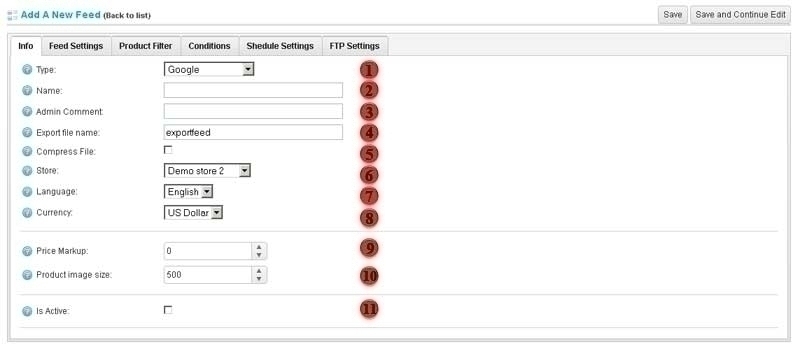
Option 1.
Open tab Conditions and create a condition (see Fig.). Only the products from Computers category with a price greater than 0 will be exported.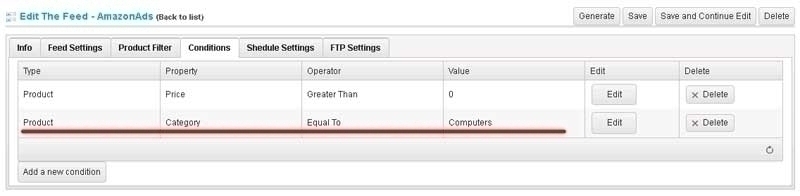
Open tab Product Filters. For all categories that do not need to be exported, change Exported parameter to “No”. If some product from the category shall be exported, change its Exported parameter to “Yes”. If the category has no parent category you can leave Inherited parameter value (it will be exported by default). All categories and products have Inherited attribute by default.
An example shows that only the products from Computers category will be exported.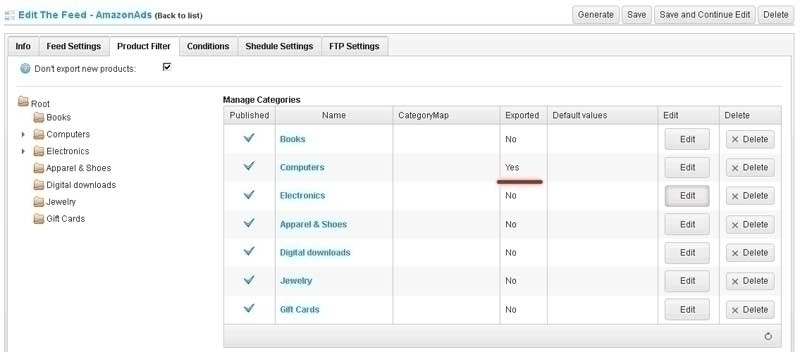
If you want to export only one subcategory Notebooks from category Computers (see Fig.). No from parent category hides ALL subcategories. You should set value Yes to the category Computers.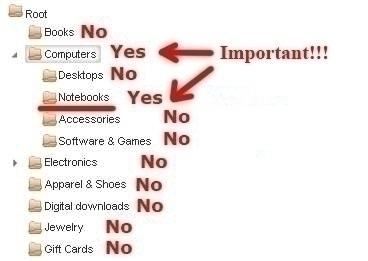
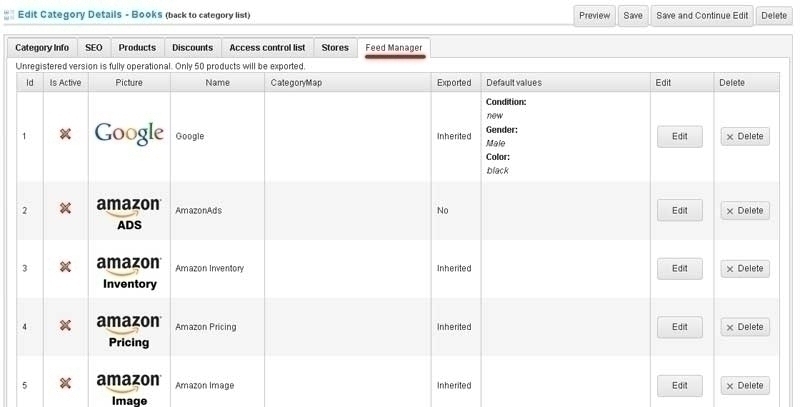
You can edit feed through the list of feeds (Menu-Plugins-FoxNetSoft. FeedManage-Feeds)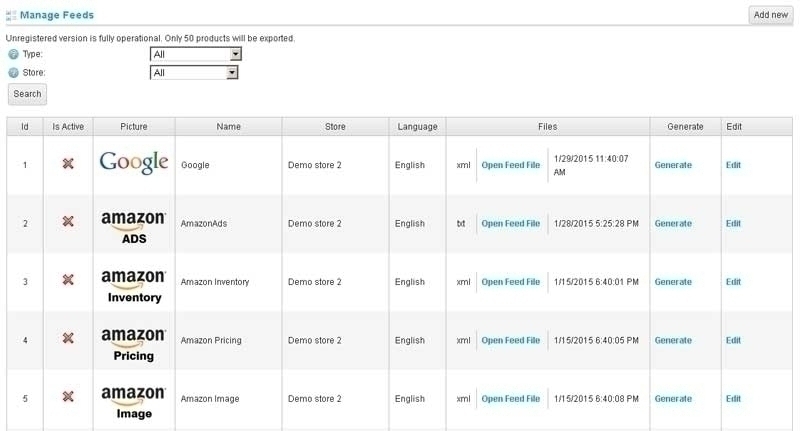

MerchantId for USA is created by default.
MerchantId SiteID=US|Country=US|Currency=USD|Version=745
Please note that for UK
MerchantId SiteID=UK|Country=GB|Currency=GPB|Version=745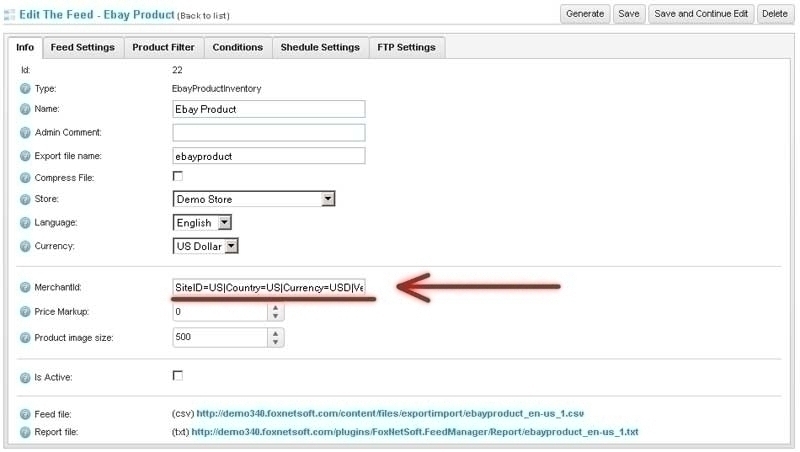
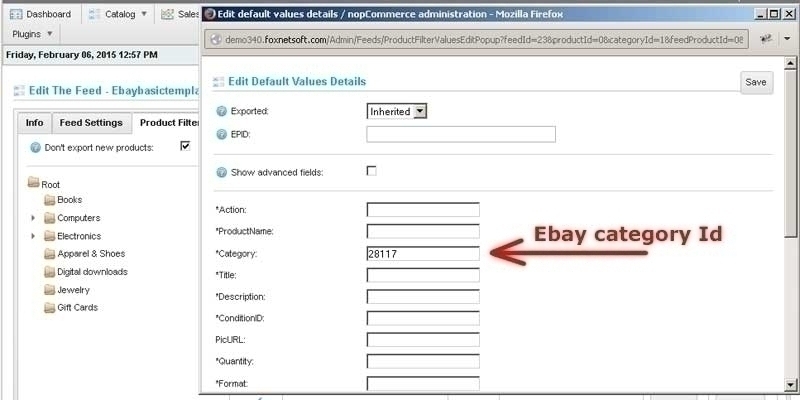
For example. Ebay Category Crafts > Home Arts & Crafts > Candles & Soap > Scents, Fragrances > Fragrance Oils (see Fig.).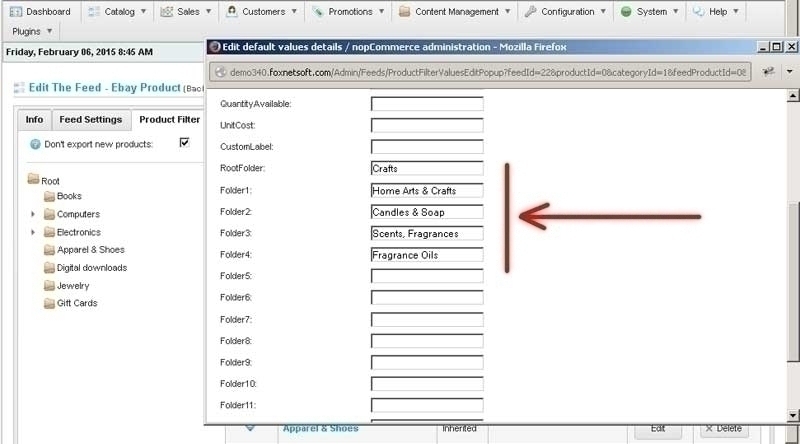


<Id>1</Id>
<Name>Google</Name>
<Image>google.png</Image>
<Schema>google.xml</Schema>
<ExportMethodId>1</ExportMethodId>
<XMLRootElement>products</XMLRootElement>
<XMLItemElement>product</XMLItemElement>
<DisplayOrder>1</DisplayOrder>
<HasMerchantId>true</HasMerchantId>
<Separator>tab</Separator>
<Taxonomy>googletaxonomy.txt</Taxonomy>
<Documentations>
<DocLinkValue>
<Message>Products Feed Specification</Message>
<HtmlUrl>https://support.google.com/merchants/answer/188494?expand=GB</HtmlUrl>
</DocLinkValue>
<DocLinkValue>
<Message>The Google product taxonomy</Message>
<HtmlUrl>https://support.google.com/merchants/answer/1705911</HtmlUrl>
</DocLinkValue>
</Documentations>
<StockStatusInStock>In Stock</StockStatusInStock>
<StockStatusOutofStock>Out of Stock</StockStatusOutofStock>
<StockStatusPresale>Presale</StockStatusPresale>
</FeedNetWork>
Id – Each feed type must have a unique number. Find next free number for your custom feed type. Ex. 10001
Name – the name of feed type. Ex. MyCustomFeed
Image – picture for feed type. Ex. MyCustomFeed.png. We recommend to use png file.
Schema – name of schema file. Using this schema file plugin will export products. You must write rules for mapping in this file. Ex. mycustomfeed.xml
ExportMethodId – What export method for exporting products plugin will use. Plugin has preconfigured many types. Ex. 1 – Google, 5 -Binq, 99999 - CustomCSV, 99998 - CustomXML, 99996 - CustomXLSX, 99997 - CustomJSON, etc.
Example.
If you want to add your new personal type you should use value 99999 - CustomCSV (or 99998 - CustomXML or 99996 - CustomXLSX, 99997 - CustomJSON) .
If you want to add new feed using existing feed type you should use value from parent feed. Ex. 1 for Google.
XMLRootElement - if you want to use XML template you can set the name of top level of tree. Default value "products".
XMLItemElement - if you want to use XML template you can set the item name of tree. Default value "product".
DisplayOrder – you can rearrange the feed types on the screen. The necessary feed types will be in the beginning.
HasMerchantId – Set true if your feed uses MerchantId value. If you needn't you can skip this value.
Separator – Separator for csv and txt files. Ex. tab, ,(comma) or .(dot). If you needn't you can skip this value.
Taxonomy - If you want to use taxonomy mapping you should write the name of the file which has list of taxonomy categories. This is plain txt file. See another taxonomy files for example.
Documentations – This block has a reference to the description of feed type.
StockStatusInStock – In this place you can set value which plugin will write for information about available product in stock. Example “In Stock”.
StockStatusOutofStock - In this place you can set value which plugin will write for information if the product is out of stock. Ex. Out of Stock.
StockStatusPresale – Some feed type supports value for pre-sale product. Example. Presale.
You want to create new feed template for Google from Italy. Because Google for Italy has another taxonomy categories or you want have another preselected values in schema file.
Open feeds.xml, create new block using existing block for Google. See example. We selected new values.
<FeedNetWork>
<Id>10001</Id>
<Name>GoogleItaly</Name>
<Image>googleitaly.png</Image>
<Schema>googleitaly.xml</Schema>
<ExportMethodId>1</ExportMethodId>
<DisplayOrder>1</DisplayOrder>
<Taxonomy>googleitalytaxonomy.txt</Taxonomy>
<Documentations>
<DocLinkValue>
<Message>Products Feed Specification</Message>
<HtmlUrl>https://support.google.com/merchants/answer/188494?expand=GB</HtmlUrl>
</DocLinkValue>
<DocLinkValue>
<Message>The Google product taxonomy</Message>
<HtmlUrl>https://support.google.com/merchants/answer/1705911</HtmlUrl>
</DocLinkValue>
</Documentations>
<StockStatusInStock>In Stock</StockStatusInStock>
<StockStatusOutofStock>Out of Stock</StockStatusOutofStock>
<StockStatusPresale>Presale</StockStatusPresale>
</FeedNetWork>
Create new picture file googleitaly.png.
Create new schema file googleitaly.xml using existing file google.xml.
Download taxonomy categories for Italy and create new file googleitalytaxonomy.txt.
Open feed list in your store and create new feed named GoogleItaly.
Open feeds.xml, create new block. See example. We selected important values.
<Id>10002</Id>
<Name>MyCustomType</Name>
<Image>MyCustomType.png</Image>
<Schema>MyCustomType.xml</Schema>
<ExportMethodId>99999</ExportMethodId>
<DisplayOrder>1</DisplayOrder>
<Separator>,</Separator>
<Documentations>
<DocLinkValue>
<Message>My Products Feed Specification</Message>
<HtmlUrl>https://yoursite.com</HtmlUrl>
</DocLinkValue>
</Documentations>
<StockStatusInStock>In Stock</StockStatusInStock>
<StockStatusOutofStock>Out of Stock</StockStatusOutofStock>
<StockStatusPresale>Presale</StockStatusPresale>
</FeedNetWork>
Create new schema file MyCustomType.xml using existing file nextag.xml for example.
You should change MyCustomType.xml using your personal mapping. See schema for another feed type.
Open feed list in your store and create new feed named MyCustomType.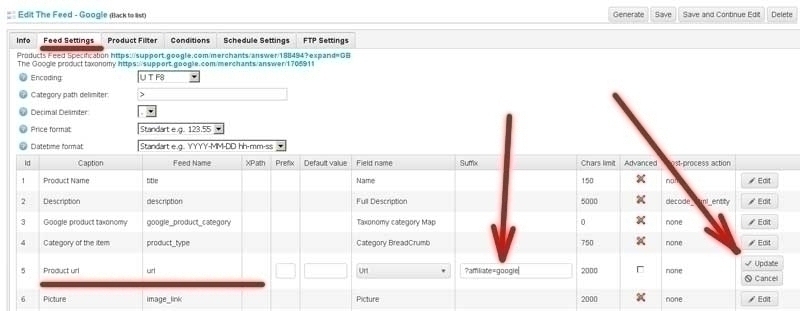
This token suppors subtokens 'productcost', 'price' and 'weigth'.
This token supports only plain mathimatic operators (+,-,*,/,())
Example:
<FieldNameCode>formula:5+(price*0.4+1)</FieldNameCode>
<FieldNameCode>formula:10+weigth*0.4+price</FieldNameCode>
<FieldNameCode>formula:5+(productcost*0.4+1)</FieldNameCode>
<Id>105</Id>
<FeedCaption>TSDLanguage</FeedCaption>
<FeedName>TSDLanguage</FeedName>
<DefaultValue>MyLanguage</DefaultValue>
<FieldNameCode></FieldNameCode>
<CharsLimit></CharsLimit>
<Required>false</Required>
<IgnoreNullOrEmpty>true</IgnoreNullOrEmpty>
<XPath>ProductData/
<UseCDATA>false</UseCDATA>
<ActionId>0</ActionId>
</FeedAttribute>
<HealthProductType>
<HealthMisc>
<TSDLanguage>MyLanguage</TSDLanguage>
</HealthMisc>
</HealthProductType>
</ProductData>
namespace TestPlugin
{
public class FeedManagerPlugin
{
//nop 4.40 and nevers
public virtual async Task<string> ReadAttributeValueAsync(Product product, ProductAttributeCombination productAttributeCombination, string feedColumName, string typeFeed, Store store, Language language)
{
if (product.Name.Contains("New!"))
return Task.FromResult<string>(product.Name.Replace("New!", ""));
else
return Task.FromResult<string>(product.Name);
}
}
public virtual string ReadAttributeValue(Product product, ProductAttributeCombination productAttributeCombination, string feedColumName, string typeFeed, Store store, Language language)
{
if (product.Name.Contains("New!"))
return product.Name.Replace("New!", "");
else
return product.Name;
}
}
}
Note:
We changed the list of method parameters for version 2.10 and never.
3. Copy the file replacenew.dll in this new folder.
~/Plugins/FoxNetSoft.FeedManager/Plugins/
Example of path
/Plugins/FoxNetSoft.FeedManager/Plugins/yourpluginname.dll
<Id>1</Id>
<FeedCaption>Product Name</FeedCaption>
<FeedName>title</FeedName>
<FieldNameCode>plugin:replacenew</FieldNameCode>
<ConvertValues />
<CharsLimit>150</CharsLimit>
<Required>false</Required>
<IgnoreNullOrEmpty>false</IgnoreNullOrEmpty>
<ActionId>0</ActionId>
</FeedAttribute>